How to Test for Vacuum Leaks on a Car
A vacuum leak in your car’s engine can cause poor acceleration, rough idling, or even stalling. Testing for vacuum leaks helps identify air bypassing the intake system, leading to incorrect air-fuel mixtures. This guide walks you through practical methods to detect leaks using everyday tools like a smoke machine, propane torch, or even a vacuum gauge. Whether you’re troubleshooting check engine lights or improving performance, these steps help restore engine balance and reliability.
Choose based on your budget and symptom severity. Start simple, then move up if needed.
Key Takeaways
- Vacuum leaks disrupt engine performance by allowing unmetered air into the intake, causing lean fuel mixtures and misfires.
- Common symptoms include rough idle, hesitation, and decreased fuel economy—these often point to a failing intake manifold gasket or cracked hose.
- Smoke testing is the most accurate method for pinpointing small or hard-to-reach leaks that other tools miss.
- Propane and carb cleaner tests are quick but less reliable and may not detect all types of leaks.
- Visual inspection should always be first before moving to advanced diagnostic tools.
- Repairing a vacuum leak improves emissions and engine longevity by restoring proper air-fuel ratios.
Quick Answers to Common Questions
Tip: Listen Before You Look
Many drivers rush to inspect visually. But sometimes, a steady hiss or ticking during idle reveals a vacuum leak before you even touch a wrench.
Question?: Can I Ignore a Small Vacuum Leak?
Answer: No—even minor leaks reduce fuel efficiency, increase emissions, and can eventually cause catalytic converter damage. Addressing it early prevents bigger repairs later.
Tip: Keep Spares Handy
Store a few replacement vacuum hoses and gaskets in your garage. They’re cheap insurance against unexpected failures, especially on older vehicles.
Question?: Does Weather Affect Vacuum Leak Tests?
Answer: Cold temperatures can make rubber hoses contract slightly, temporarily sealing minor cracks. Test in warm conditions for accurate results.
Tip: Document Your Findings
Take photos or notes during each test. This helps track progress and makes future diagnostics faster if issues return.
Troubleshooting Common Issues
What Is a Vacuum Leak and Why Should You Care?

Visual guide about how to test for vacuum leaks on a car
Image source: nonnaidii.com
Your car’s engine runs best when the right amount of air mixes with fuel. The intake manifold controls this process by drawing in clean, filtered air through the throttle body. When everything works correctly, the system maintains a strong vacuum—a partial pressure below atmospheric pressure—that powers accessories like the brake booster and ensures smooth engine operation.
But what happens if unmetered air sneaks into the intake? That’s exactly what a vacuum leak does. It bypasses the mass airflow sensor (MAF), so the computer thinks it’s getting less air than actually enters the engine. As a result, the fuel mixture becomes too lean, leading to poor performance, increased emissions, and potential damage over time. Detecting and fixing vacuum leaks early saves money, boosts efficiency, and keeps your ride running smoothly.
This guide will show you how to test for vacuum leaks safely and effectively, whether you’re a DIY enthusiast or just want to understand your car better.
Tools and Materials You’ll Need

Visual guide about how to test for vacuum leaks on a car
Image source: image.slidesharecdn.com
Before diving in, gather these items. Most are inexpensive and available at auto parts stores or online:
- Flashlight
- Socket set and wrenches
- Vacuum pump or hand-held vacuum gauge (optional)
- Smoke machine (rental or owned)
- Propane torch or bottle of starting fluid
- New vacuum hoses (if replacing)
- Clean rags and degreaser
You don’t need all tools for every method—start simple and escalate as needed. For example, try the visual check and carb cleaner test before investing in a smoke machine.
Step-by-Step: How to Test for Vacuum Leaks
1. Turn Off the Engine and Let It Cool
Safety first! Never work on a hot engine. Allow it to cool completely before beginning any inspection. Also, disconnect the negative battery terminal to avoid accidental starts.
2. Perform a Visual Inspection
Look for obvious signs of wear:
- Cracked, brittle, or loose vacuum hoses (usually made of rubber or plastic)
- Discolored or melted components near the intake manifold
- Worn-out gaskets between the intake and cylinder head
Check common trouble spots like the PCV valve, brake booster line, and EVAP system connections. Replace damaged hoses immediately—even small cracks can cause big problems.
3. Use Carburetor Cleaner or Propane Torch (Quick Test)
Start the engine and let it idle. Spray carburetor cleaner around vacuum hose connections, gaskets, and intake ports while listening carefully.
- If the engine RPM increases slightly, you’ve found a leak!
- Alternatively, use a propane flame—watch for sudden revving or hesitation.
⚠️ Caution: Never hold open the throttle while spraying. These methods only confirm large leaks and may damage sensors if used incorrectly.
4. Apply Smoke Testing (Most Accurate Method)
For thorough detection, especially on older cars or complex systems:
- Locate the intake boot where the air filter connects.
- Disconnect it and insert the smoke machine nozzle securely.
- Turn on the smoke generator and watch for escaping smoke.
- Smoke will visibly escape from any leak—no guesswork needed!
This method catches tiny leaks invisible to the naked eye and works best on engines with intact intake systems.
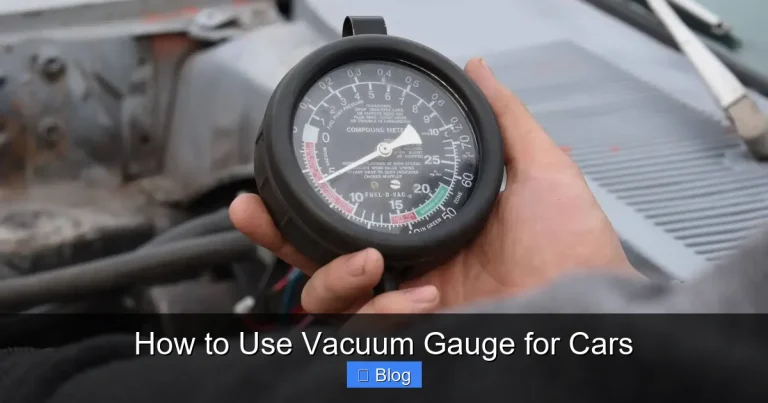
5. Check with a Vacuum Gauge (Advanced Option)
If your vehicle has a vacuum port (often labeled “VAC” or “PCV”):
- Attach a vacuum gauge to the port with a T-fitting.
- Let the engine run until stable.
- Observe the reading—normal idle vacuum ranges from 17–22 inHg (inches of mercury).
- A steady drop below 10 inHg suggests a significant leak.
Note: Not all vehicles have accessible vacuum ports. Consult your repair manual for specifics.
6. Inspect During Engine Operation
With the hood open, listen closely during startup and idle:
- A hissing sound indicates pressurized air escaping.
- Unusual ticking or popping noises during acceleration may signal intermittent leaks.
Pair this with a flashlight scan of the intake area for real-time clues.
Quick Reference: Testing Methods Compared
| Method | Best For | Accuracy | Ease of Use | Cost |
|---|---|---|---|---|
| Visual Inspection | Obvious damage (cracks, breaks) | Low | Very Easy | Free |
| Carb Cleaner/Propane Test | Large, accessible leaks | Medium | Easy | $5–$20 |
| Smoke Machine Test | Small or hidden leaks | Very High | Moderate | $50–$200 (or rental) |
| Vacuum Gauge | System-wide pressure issues | High (but indirect) | Moderate | $30–$80 |
Sometimes tests give false positives or miss subtle leaks. Here’s how to handle them:
- Engine still runs poorly after repair: Double-check all connections. A missed crack or forgotten old gasket causes recurring problems.
- No RPM change during carb cleaner test: The leak might be too small or located deep inside the intake. Try smoke testing instead.
- Vacuum gauge shows normal readings but idle is rough: The issue could be unrelated—check spark plugs, fuel injectors, or ignition coils.
- Smoke test shows no leaks but problem persists: Ensure the smoke machine was connected correctly and the engine wasn’t cranked during testing (which disrupts airflow).
Remember: vacuum leaks rarely occur in isolation. Always rule out other causes like clogged air filters or faulty oxygen sensors.
How to Fix a Vacuum Leak Once Found
Finding the leak is half the battle. Here’s how to seal it:
- Replace cracked hoses: Cut out the damaged section and splice in new hose with clamps or crimps.
- Reseal intake manifold gaskets: Remove the intake, clean mating surfaces thoroughly, and install fresh gaskets with proper torque specs.
- Tighten loose fittings: Use appropriate wrenches to secure clamps without over-tightening (rubber can crush).
- Clear debris from ports: Use compressed air to blow out carbon buildup that might block seals.
After repairs, recheck for leaks using your preferred test method. Clear any stored diagnostic trouble codes (DTCs) from the ECU and take a short drive to confirm improvement.